[ad_1]
Are you wondering about the proper way to use H1-H6 heading tags in WordPress?
When you use headings effectively in your posts and pages, you make your content more readable, improve user experience, and boost your website’s SEO.
In this article, we’ll show you how to properly use heading tags in WordPress.
What Are Heading Tags in WordPress?
Heading tags are HTML elements used to identify the title and headings on a webpage.
Both visitors and search engines will understand your content better when your posts and pages contain headings. When you add headings correctly, you can improve the post’s SEO, so it ranks higher on search engine results pages (SERPs).
You add a logical structure to your posts by using different heading levels. Post titles will use H1 tags, and you typically use H2 tags for the main headings and H3 tags for subheadings.
When viewing a webpage as HTML, heading tags look like this:
<h2>Heading</h2>
<h3>Subheading</h3>
<h4>And so on</h4>
However, you can easily add heading tags to your WordPress posts and pages without using code.
We cover this step-by-step in our guide on how to change the font size in WordPress.
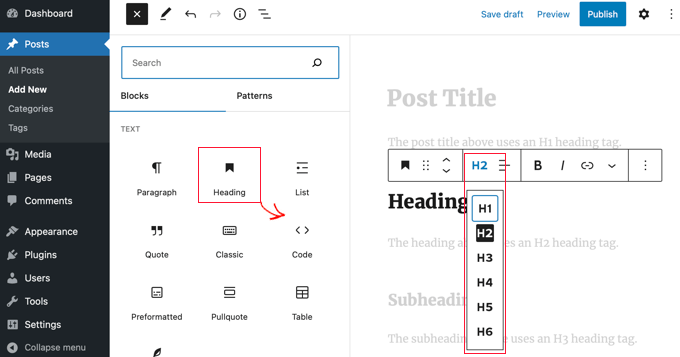
The sizes and colors of the different heading styles are controlled by your theme’s stylesheet, and we’ll show you how to customize their appearance below.
With that being said, let’s take a look at how to properly use H1-H6 heading tags in WordPress. Here is a quick overview of what we’ll cover in this guide:
1. Use Headings and Subheadings to Structure Your Content
Headings help you create a logical structure for a post or page. They guide your readers through the article by briefly describing the main sections of the topic and how they relate to one another.
You can use up to six hierarchical heading levels to structure your content:
H1 tags are the most important and there should be only one H1 heading in a post. This tag is used for the post title, and you can learn how to add and optimize your titles in our guide on SEO titles and H1 post titles in WordPress.H2 headings are the main headings and are used in the different sections of a post. If you need to split these sections up into subsections, then you can use H3 tags. Most themes will display H3 subheadings in a smaller font than H2 headings.Most posts only need two or three levels of headings, so you may never use heading tags H4 to H6 on your WordPress website. However, they can be used to provide further structure in very long posts or academic articles.
Structuring your posts in this way helps both website visitors and search engine crawlers quickly grasp the context of your content. A well-structured post may be ranked higher on search engine results pages.
Tip: Make sure you use heading tags to structure your article, and not simply for formatting, such as making a block of text larger. For more on formatting text, see our guide on how to easily change the font size in WordPress.
2. Customize the Appearance of Headings to Grab Attention
Using headings in your content is a great way to grab user attention with a larger-size font. In most WordPress themes, headings are in a larger font than regular body text. They allow you to break your posts and pages into sections.
You can also customize the appearance of your headings, so they stand out even more. For example, you can attract attention to your headings by adding color, especially with H1, H2, and H3 headings.
Some themes offer preset font choices that will change the font on your entire website.
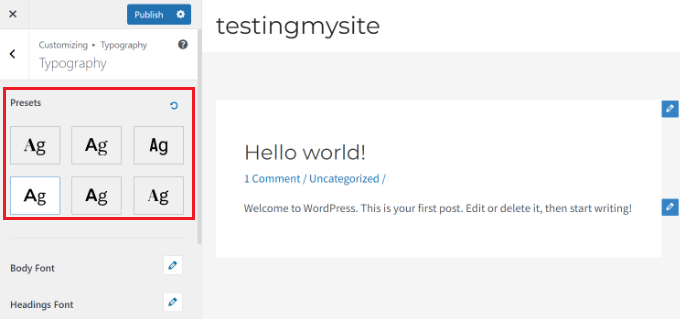
Besides that, you can also change fonts for individual elements on your theme. For example, you can use a different font for the body text and headings. There are even options to use separate fonts for each heading level.
For more details, see our guide on how to change fonts in your WordPress theme.
3. Use Headings to Improve Readability and User Experience
No one likes a wall of text. The easiest way to make your content more readable is by breaking it up using headings and short paragraphs.
This makes it easier to read and understand your content. It also helps your users scan through the article quickly and find the sections they want to read more thoroughly.
These factors will increase page views and reduce bounce rate, which is good for SEO.
Checking the Readability of Your Headings Using All in One SEO
The best way to check the readability of your post is by using All in One SEO (AIOSEO). It’s the best WordPress SEO plugin that allows you to easily optimize your WordPress website for search engines and social media platforms.
Note: The free version of AIOSEO will show you if your post contains enough headings, and also let you set a focus keyphrase as we cover below. However, the extra features of the premium version will get your site ranking even higher on search engines.
Once you have installed and configured All in One SEO, simply scroll down below the post content to the AIOSEO General Settings area.
You will find a ‘Page Analysis’ section that gives you a list of actionable tasks you can follow to make the post rank higher. It includes tabs for ‘Basic SEO,’ ‘Title,’ and ‘Readability,’ and each tab shows you how many errors you need to fix in that category.
The ‘Readability’ tab offers suggestions on how to improve readability, such as including images, shortening paragraphs and sentences, using transition words, adding subheadings, and more. Items marked with a red cross need more work.
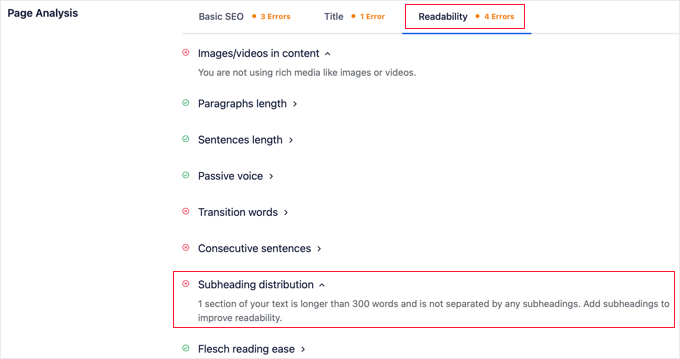
Under ’Subheading distribution’, you will be given feedback on any steps you need to take to improve the headings in the post, such as:
‘1 section of your text is longer than 300 words and is not separated by any subheadings. Add subheadings to improve readability.’‘You are not using any subheadings, but your text is short enough and probably doesn’t need them.’‘Great job!’
You should aim to get a green checkmark next to every item under the Page Analysis section to improve the post’s SEO.
4. Optimize Your Headings for SEO by Adding Appropriate Keywords
Adding headings to your blog posts is great for your site’s SEO. That’s because search engines give headings more weight than normal paragraph text. Google will try to use the content of your headings to better understand the topic you are writing about.
You can optimize your headings for SEO by adding appropriate keywords. These are the keywords users will search for when looking for your content. You can learn how to find them in our guide on how to do keyword research for your WordPress blog.
But it’s important that you don’t just add random keywords to your headings. Only use keywords when they make sense and clearly describe what that part of the post is about.
Checking Whether Your Headings are SEO Optimized Using All in One SEO
You can use All in One SEO‘s SEO Analysis feature to check whether you have used enough keywords in your headings.
First, you need to add a focus keyword to your post. Simply scroll to AIOSEO Settings under the post content, then type the post’s most important keyword next to ‘Focus Keyphrase.’
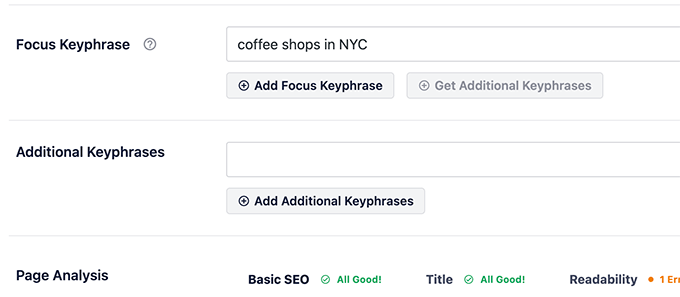
The plugin will then analyze your content for the keyword, show you a score, and give suggestions on how to improve your ranking.
Among other things, All in One SEO will show you if your post has a healthy number of keyword-optimized H2 and H3 subheadings.
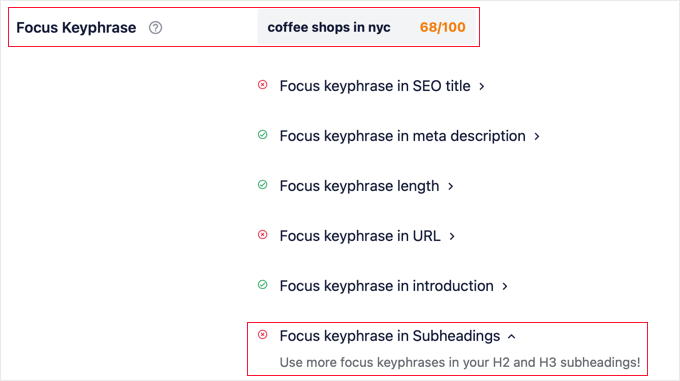
You can also use All in One SEO to optimize the post title. For more details, see our guide on how to use a headline analyzer in WordPress to improve SEO titles.
Besides adding keywords, we also recommend making your headline catchy and click-worthy. That’s because your organic click-through rate (CTR) plays an important role in SEO.
5. Automatically Create a Table of Contents From Headings
A table of contents is a clickable list of the headings contained in a post. They make it easier to jump between the sections of a long article, improving navigation through your content.
When your visitors click a link in the table of contents, they will be taken immediately to that heading in the article. This allows users to quickly move to the content they are interested in.
All in One SEO can save you time by automatically generating the table of contents based on your subheadings, while also making it completely customizable with editable links.
When editing your post, you’ll need to click the blue ‘+ ’ icon and locate the ‘AIOSEO – Table of Contents’ block. Simply drag the block onto the post or page where you wish the table of contents to appear.
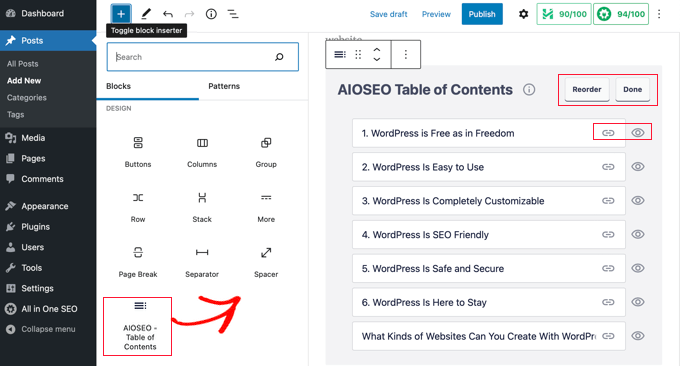
The plugin will automatically identify the headings on the page and add them to your table of contents. If you use different heading levels (say H2 and H3), then lower-level headings will be indented to show the structure of your content.
If you are still writing the contents of your post or page, then any headings added to the document will be automatically added to the table of contents. Also, any changes that you make to the headings themselves will be reflected in the ToC block.
For step-by-step instructions, see our guide on how to create a table of contents in WordPress posts and pages.
6. Optimize Headings to Rank for Google Featured Snippets
Organizing your heading tags well may help your content rank for Google featured snippets. These are highlighted results that are shown at the top of the search results page.
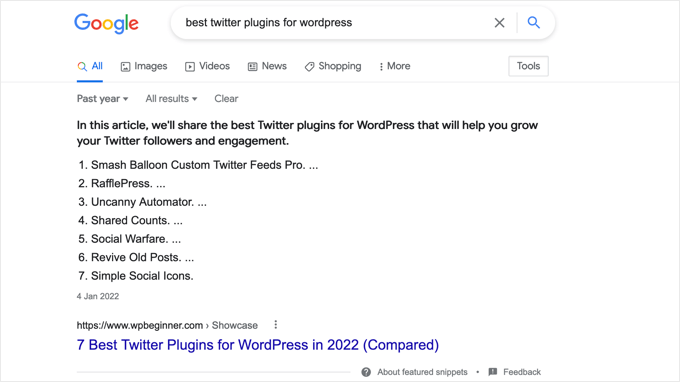
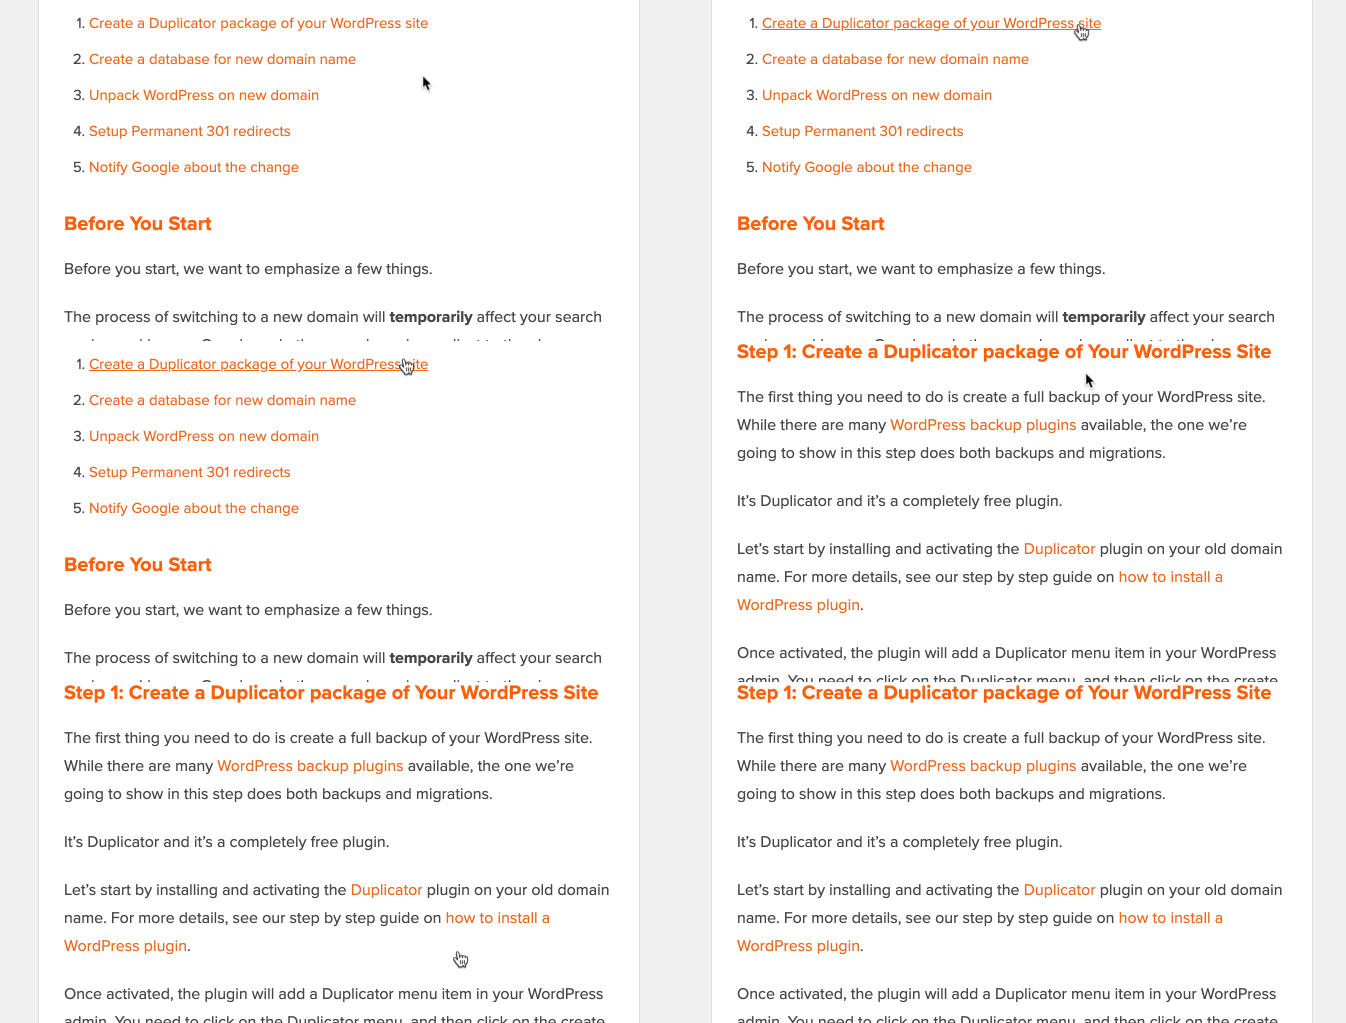
Google was able to pull the headings from the above post to create the number list you see on the search results page, earning this post a featured snippet.
This will help you get the maximum SEO traffic since a user is more likely to click on a featured snippet than a plain search result.
For tips on ranking for featured snippets, see our guide on how to get a Google Featured Snippet with your WordPress website.
FAQ: Frequently Asked Questions About Heading Tags in WordPress
Here are some of the most common questions our readers ask us about heading tags.
What is the difference between H1 and H2 in WordPress?
H1 is used for the post title, and this should be the only H1 heading in a post. H2 is used for the main headings throughout a post. For many blog posts, H1 and H2 are the only heading tags you will need.
What are the six types of headings in WordPress?
There are six types of heading tags in WordPress, and they are H1, H2, H3, H4, H5, and H6. The H1 tag is used for the title and H2-H6 can be used for different levels of headings and subheadings throughout the post.
You don’t need to use all six levels of headings in a post. However, you shouldn’t skip a level. For example, when you use H2 for headings, you should use H3 for subheadings, and not skip straight to H4.
What is the difference between H1 and TITLE in WordPress?
The title you type at the top of a post or page is an H1 heading. However, when search engines display the post in search results, they will use a different title identified by a TITLE tag rather than H1. This is known as the SEO title or meta title.
You can add a meta title to your post using an SEO plugin such as All in One SEO. You can learn more in our guide on the difference between SEO titles and H1 post titles in WordPress.
How do I create an H1 heading in WordPress?
When you create a new post or page in WordPress, you will see the words ‘Add title’ at the top of the page. Simply type the post title on this line to add an H1 heading.
While it is possible to create additional H1 headings using Heading blocks, we don’t recommend using more than one H1 tag.
How many H2 headings should a WordPress post have?
H2 headings are used to break up a long post and make it more readable, and there are no rules about how many you should use. In fact, if your post is only a few paragraphs long, then you may not need to add H2 headings at all.
The All in One SEO plugin has a Page Analysis feature that can check your blog post for readability. In general, if you have 300 words of text or more without a heading, it will recommend adding more headings or subheadings.
Do heading tags affect your WordPress website’s SEO?
Yes, the title of your blog post is extremely important for search engine optimization (SEO). A powerful title can get people to click on the link to visit your website, so we recommend you use a headline analyzer to create engaging titles that get more clicks.
H2-H6 headings can also impact SEO. They improve user experience, and this improves SEO. Adding appropriate keywords to your headings may also help your post rank higher.
We hope this tutorial helped you learn how to properly use H1-H6 heading tags in WordPress. You may also want to see our guide on how to create an email newsletter, or our expert pick on the best SEO plugins and tools.
If you liked this article, then please subscribe to our YouTube Channel for WordPress video tutorials. You can also find us on Twitter and Facebook.
The post How to Properly Use Heading Tags in WordPress (H1-H6 Explained) first appeared on WPBeginner.
[ad_2]
Source link
